Introduction:
In this article i will explain about installation of SQL Server 2008 in Windows 7 very easy with Snapshot.
Step1: Open your SQL Server 2008 Drive and folders. After what my system looks as shown in figure.
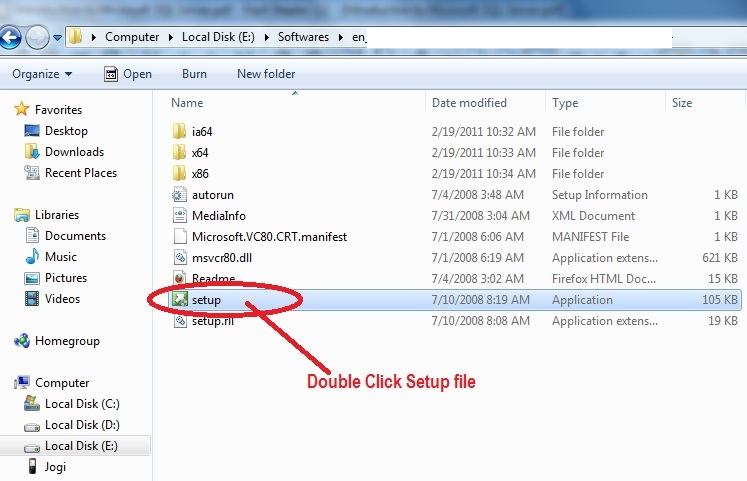
Step2: Double click the Setup.exe file. After a few seconds the two windows would come up at the a time. The bellow window repeated 2 or 3 time.

Step3: If you checkout the online compatibility click Check for solution online otherwise click Run Program. After a few seconds the bellow dialog box appear.

Step4: The above window will disappear and then the main installation window appears.

Step5:In the left selection of the above window, Click Installation hyperlink.

Step6:In the right selection, Click New SQL Server stand-alone Installation. The installation would starts please wait few seconds the dialog box appear.

Step7: The dialog box disappear, another window would come up.

Step8: The complete the progress click Ok. the window would come up.
 Step9: Click on the Install
Step10:(Optional) some times the above window displayed. Go to Step5 doing the same steps.

Step11: Click on the Next button

Step12: Installation type as your wish i.e here we can Click first radio button Perform New installation of SQL Server 2008

Step13: If you install free edition click first radio button or if you are install with product key, click second radio button and enter the product key. Then click Next

Step14:The License Terms page, Select the I accept the license terms check box and then click Next

Step15: Feature Selection: Select the features which you want to install. Here we can click Select all button and click Next button again

Step16:Instance Configuration: Most of the cases, you should accept the Default instance as MSSQLSERVER.

Step17:Disk Space Requirements: If you have a sufficient disk space on the drive and Installation pathe where you want to install. click Next

Step18: Server Configuration: here carefully observe the server accounts. click on the Select the same account for all sql server services otherwise you use different server accounts.

Step19: Enter the account name and password or browse the network server accounts.

Step20:Check out the user name and password and click Next

Step21:Database Engine Configuration: Select the authentication mode which you want and Click Add Current User and click Next again

Step22:Analysis Services Configuration: Click on the Add Current user and click Next

Step23:Reporting Services Configuration: select the last Check box Install, but do not configure the report server.

Steps24: Select Check boxes if you want to help Microsoft help you.Click on Next again

Step25: Read it and Click Next
 Step26: To start installation, Click Install. The progress bar indicates the evolution.
  Step27:This can take while completion of installation after clcik Next.
Step28: After Next button read the message and click Close
No comments:
Post a Comment